

Is Stain Ok For Garden Beds
Kari Spencer is a Master Gardener volunteer and a local gardening and homesteading speaker. Her family operates The Micro Farm Project.
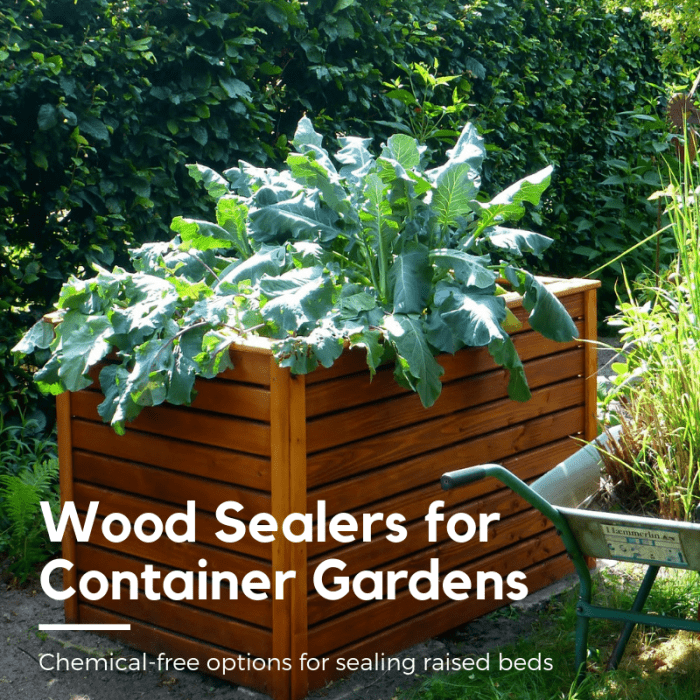
This article will break down five of my favorite safe, chemical-free options for wood sealing container gardens and raised beds.
Counselling, CC0-BY-SA, via Pixabay
From cities and suburbs to rural environs, people are discovering the joys of vegetable gardening and the health benefits of controlling the chemicals that come in contact with their food. Many of these gardeners are opting to grow plants in raised beds or containers in lieu of traditional, in-ground row gardens.
Gardens come in constant contact with water and weather, so those that are made of wood or other porous materials require a sealant to prevent degradation. However, many conventional wood sealers on the commercial market are made with solvents and other ingredients that may release hazardous chemicals and volatile organic compounds (VOCs) into the air and your garden soil. Hazardous chemicals may find their way into the plants themselves, and ultimately into your body if you are growing edibles.
I recently came across some free wooden wine crates that were the perfect size for a small herb garden. The wood was completely unfinished and would need to be sealed. I began to research organic and natural options and found many suggestions online, ranging from low-VOC commercial products to homemade organic preparations. These products varied widely in cost, effectiveness, and ease of use.
This article will rate what I consider to be the best options based on these criteria. I will also explain how to make the homemade products and where to obtain materials.
Top 5 Natural Wood Sealers and Conditioners
- Raw Linseed Oil
- SoySeal Wood Sealer and Waterproofer
- Soapstone Sealer and Wood Wax
- Homemade Milk Paint (see several different recipes below)
- Homemade Beeswax and Jojoba Oil Wood Conditioner (my favorite)
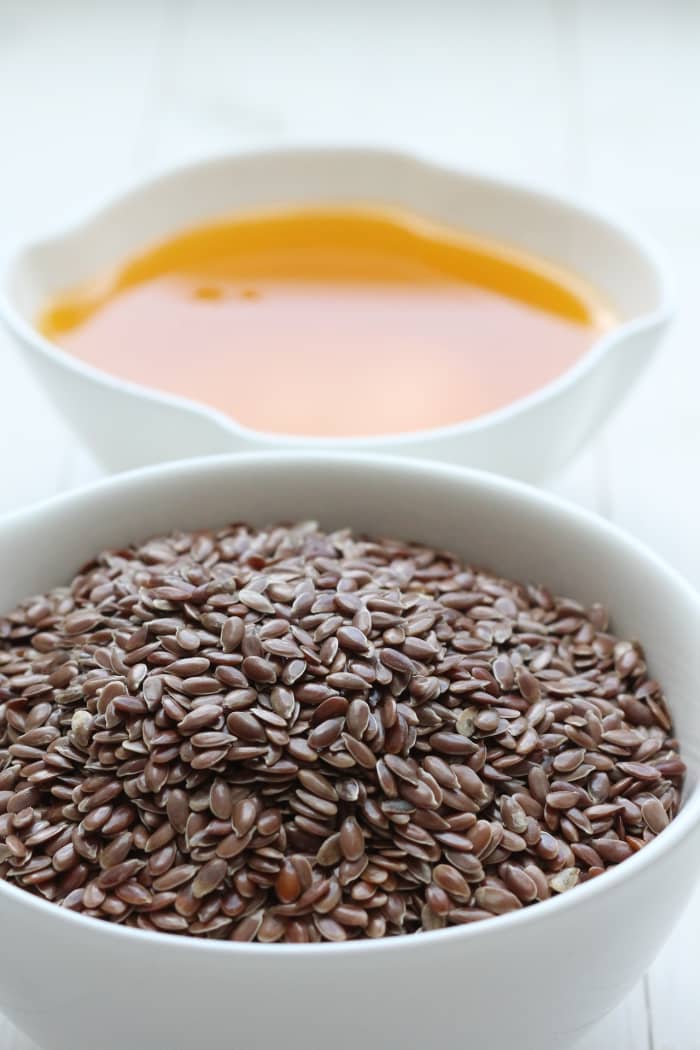
Raw linseed oil is an all-natural, eco-safe wood preservative that is fairly inexpensive and can be purchased in organic forms.
kamilla02, CC0-BY, via Pixabay
1. Raw Linseed Oil
Raw linseed oil is an eco-safe wood preservative that was commonly used before modern synthetic sealers were created. It is an all-natural product that can be purchased in organic forms. It is fairly inexpensive and easily applied with a brush. The oil is very slow-drying and will take days or even weeks to thoroughly dry. If you choose to use linseed oil, be certain to purchase it in raw form, not boiled, which contains additives that are potentially toxic.
Linseed Oil Sources
- I recommend linseed oil by Sunnyside Corp. It is natural and the price is very reasonable.
- Linseed oil may also be available at local woodworking or craft stores.
A Note About Products' VOC Levels
The numbers cited on a low-VOC paint can are measurements taken before any additives or pigments are added, both of which can contribute to higher VOC levels than indicated. And paints can be labeled "VOC Free" if they contain less than 5 g/l.
Therefore, I was unable to verify whether or not a product is truly VOC free, or may contain very small levels of these toxins. The individual gardener must weigh the cost and effectiveness of the product, which are both excellent, with the possibility of a minute amount of toxicity.
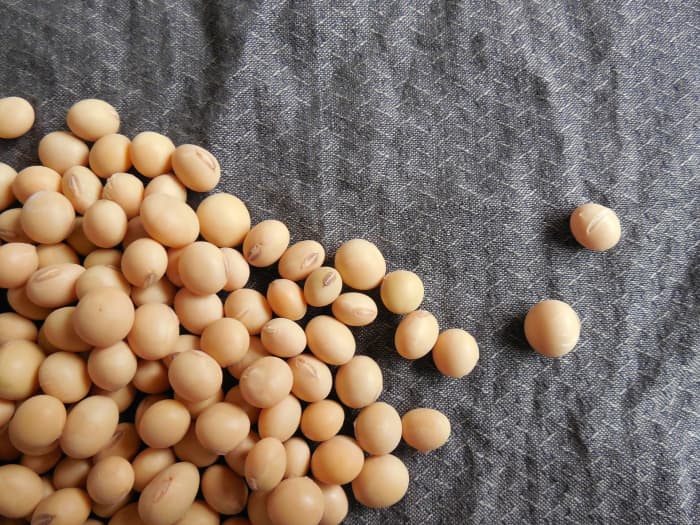
Made out of soybeans, the SoySeal wood sealer and waterproofer is a solid choice for sealing raised beds and containers.
Jing, CC0-BY, via Pixabay
2. SoySeal Wood Sealer and Waterproofer
SoySeal is a non-toxic commercial wood sealer. According to the label, it is VOC free and claims to provide a 24-month seal. It contains oil, water, and other ingredients.
Though it is one of the least expensive natural commercial products on the market, I did not rate it higher on the list, because I was unable to verify the exact contents of the "other ingredients."
3. Soapstone Sealer and Wood Wax
- Soapstone Sealer and Wood Wax, manufactured by the Real Milk Paint Company, is safe for wood that comes in contact with foods. It contains food-grade walnut oil and carnauba wax. It contains no solvents and no VOCs.
- The product is easy to apply with a soft cloth. A second application can be made in 30 minutes, and the finish dries overnight. The product cures in 15–30 days, rendering it safe for people who have nut allergies.
- The only drawback to this product that I can detect is cost, which is the highest amongst the products recommended in this article.
4. Milk Paint
Milk paint is an organic preparation that gives a whitewash finish to wood. Before paint was manufactured and sold commercially, it was made at home with simple ingredients and techniques passed down through the generations. Due to the abundance of milk in early rural America, a combination of milk paint and iron oxide (rust) or animal blood was often used to paint idyllic red barns that dot the countryside to this day, a testament to the durability of the finish.
As the name suggests, milk paint is formulated using curdled milk or curd cheese, lime, and pigment (if color is desired). I rate milk paint high on the list due to its simplicity and ease of use. It can be made with organic ingredients very inexpensively. The paint is time-tested and lovely. The only drawback to consider is that milk paint can water-spot, a likely occurrence in the garden.
Read More From Dengarden
After painting with milk paint, I recommend rubbing the dried surface with linseed or vegetable oil. Water spots can easily be removed with a soft cloth and oil. Some consider these spots desirable, adding to the rustic appearance that milk paint provides.
How to Make Milk Paint (Lemon Juice Recipe)
Here's a recipe to make your own milk paint with a lemon juice base.
Ingredients You'll Need
- Mixing container with a lid (such as a wide-mouth jar)
- Large bowl
- Sieve
- Cheesecloth
- Polyester or natural bristle paint brush
- Soft cloth or rag
- Steel wool or sand paper
- 1 large lemon (juiced)
- 1 quart skim milk
- Oil (olive, linseed, walnut, or mineral oils are recommended)
Directions
- In a pitcher or carafe, stir together the lemon juice and milk. Leave the mixture at room temperature overnight or over two nights. The milk will curdle. Do not jostle or stir the mixture once the lemon juice has been added.
- Separate the solid curds from the whey liquid by placing a sieve lined with cheesecloth over a large bowl. Pour the milk through the sieve, discarding the liquid whey or saving it for cooking purposes (it makes a wonderful substitute for water in bread recipes).
- If color is desired for the exterior surfaces of your garden containers, add a few drops of non-toxic acrylic paint and stir in thoroughly. Continue adding paint, one drop at a time, stirring constantly until the desired color is achieved.
- Use the paint immediately, as it does not store well. Apply the first coat with a brush, and allow to dry for at least one hour. The first coat may be a bit difficult to spread. After one hour, sand the paint or rub it with steel wool. Then paint your second coat.
- Once the paint is completely dry, rub the surface again with steel wool or sandpaper. Vacuum or wipe off any dust that accumulates, and rub the surface with oil.
- If the paint gets water spots, remove them by rubbing with a soft cloth and oil. Optionally, cover with a coat of SoySeal, Soapstone Wood Sealer, or a layer of homemade wood polish.
Strain the paint if large curds remain visible after 15–30 minutes.
Rebecca Siegel, CC0-BY, via Flickr
How to Make Milk Paint (Hydrated Lime Recipe)
This recipe adds hydrated lime (type S) to the mixture for greater durability. Be careful when using lime (the mineral, not the fruit). Do not get it in your eyes, or nose, or on your skin. Make certain that you purchase the correct form of lime, which is hydrated and less reactive than other forms.
Additionally, do not mix or store lime in a metal container, as the alkaline pH may etch or discolor the surface.
Ingredients You'll Need
- Gather all of the same supplies as the previous recipe
- Dishwashing gloves
- 1 quart of skim milk
- 1/2 cup of vinegar
- 1/4 cup of hydrated lime
- 1/2 cup of water
Directions
- In a pitcher or carafe, stir together the vinegar and milk. Leave the mixture undisturbed at room temperature overnight (or over two nights) to curdle the milk. Once the milk and vinegar are combined, do not stir or jostle the mixture.
- Separate the solid curds from the whey liquid by placing a sieve lined with cheesecloth over a large bowl. Pour the milk through the sieve, discarding the liquid whey or saving it for cooking purposes. Rinse the curds to remove residual whey and vinegar, and set them aside.
- Wearing dishwashing gloves, place lime in a glass or plastic container. Slowly add water, stirring the mixture into a creamy paste.
- Transfer the milk curds to the container and stir it into the lime mixture. Curds will begin to dissolve. Larger curds may take 15–30 minutes to completely dissolve. If there are still visible curds in the mixture after 30 minutes, strain the paint through cheesecloth to remove them.
- If color is desired for the outside surfaces of your garden containers, add a few drops of non-toxic acrylic paint and stir in thoroughly. Continue adding paint, one drop at a time, stirring constantly until the desired color is achieved.
- Use the paint immediately, as it does not store well. Apply the first coat with a brush, and allow to dry for at least one hour. The first coat may be a bit difficult to spread. After one hour, sand the paint or rub it with steel wool. Then paint your second coat.
- Once the paint is completely dry, rub the surface again with steel wool or sandpaper. Vacuum or wipe off any dust that accumulates, and rub the surface with oil.
- If the paint gets water spots, remove them by rubbing with a soft cloth and oil. Optionally, cover with a coat of SoySeal, a layer of Soapstone wood wax, or homemade wood polish.
Storing Milk Paint and Artistic Techniques
If you do not use all of your paint, it will store for up to four days in the refrigerator, covered with a lid. Return to room temperature before using.
One favorite painting technique used by antique and vintage furniture dealers is to apply several coats of milk paint in different colors. An appealing combination is to paint a layer of dark green, followed by a layer of barn red, which is then covered by a layer of black. Gentle rubbing with steel wool or sandpaper—or the slower process of wear caused by use—will cut through the layers, revealing the various colors. This creates the antique look of old paint for primitive or farmhouse décor.
Another vintage look can be achieved by painting two contrasting colors. Start by painting a base coat of the first color. Allow it to dry, and then paint a second layer of the same color. When the second coat is dry, begin to apply the contrasting color, wiping each stroke of paint immediately (or after several seconds) with a clean, soft cloth.
Note: Milk paint is also a natural alternative for painting children's furniture and toys.
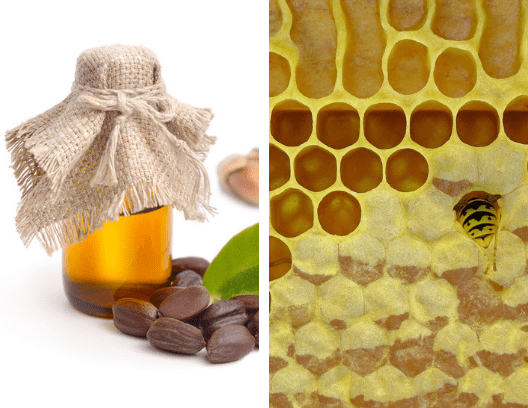
This wood conditioner is made from jojoba oil and beeswax.
CC0-BY, via Pixabay
5. Homemade Beeswax and Jojoba Oil Wood Conditioner
My favorite choice is homemade wood conditioner, made with beeswax and oil. Jojoba oil is an excellent choice, but mineral oil would also work well in this recipe.
This formula is very easy and inexpensive to make. It provides a beautiful, shiny finish that brings out the natural beauty of wood. The wax protects wood surfaces by repelling water and dirt. It can be used as a wood conditioner or polish, or as a sealant applied over a base finish of paint.
The resulting product is food safe, non-toxic, and you don't have to wear gloves during the application process, because it is good for your skin! Additionally, when applied to children's furniture or toys, it is edible and won't harm your little ones if they chew on the finish.
Apply this wax to your wooden garden beds or containers as a natural finish, or use it to seal milk paint finishes. Keep a jar of this wax handy to condition your cutting board, wooden salad bowls, or butcher block countertops. Apply it to chapped skin in the wintertime. It also makes a fantastic lip balm.
How to Make Beeswax and Jojoba Oil Wood Conditioner
For a large project, this recipe is easily doubled.
Ingredients You'll Need
- Double boiler, or a sauce pan
- Glass or metal measuring cup with a handle
- Glass or plastic container with a lid (such as a large margarine or whipped topping tub)
- Spoon
- Polyester or natural bristle paint brush
- 4 ounces of beeswax or beeswax pellets (pastilles)
- 16 ounces of jojoba or mineral oil
Directions
- Divide the beeswax into four equal (1 oz) parts.
- Fill a double boiler base with water and bring to a boil over high heat. Place 1/4 of the beeswax in the top pot of the double boiler, reduce heat to medium-low and melt the wax completely. (If you do not have a double boiler, simply fill a sauce pan with water and bring it to a boil.)
- Place beeswax in a glass measuring cup, and hang the handle over the edge of the pan, immersing the bottom of the cup in the boiling water.
- Hint: To increase the speed at which the wax will melt, chop or grate it into smaller pieces. Do not allow the water to boil dry at any time. Wax can ignite at high temperatures.
- Pour 1/4 of the oil (4 oz) into the melted wax. Stir to combine. Allow any of the wax that hardens upon contact with the oil to re-melt, and then remove the mixture from the heat.
- Set the mixture on a cutting board, towel, or cooling rack. As the wax cools, stir frequently to prevent separation of the wax and the oil. When completely cool, transfer the mixture to a storage container with a lid. Repeat the process until you have enough wax to complete your project.
- Brush a layer of the wax onto wood surfaces and allow to dry for several hours in the sun. When the oil has soaked into the wood, apply a second coat.
- Hint: This recipe can be modified to create a thicker furniture polish that rubs on with a soft cloth. Decrease the amount of oil to 12 oz. For a citrus-scented polish, add a few drops of organic lemon or orange food flavoring when you remove the mixture from the heat.

Here is the IPPC logo on a pallet.
Is Pallet Wood Safe for Gardening?
It has recently become very popular to recycle wooden pallets for gardening projects. Old pallets may contain pesticide chemicals that are problematic for gardening. But in recent years, new EPA standards have led many companies to use heat treatment rather than methyl bromide fumigation to treat pallet wood.
Additionally, the International Plant Protection Convention now requires pallets to display an IPPC logo, which certifies that the pallet was either heat-treated or fumigated with methyl bromide.
The logo includes a two-letter country code (such as US for the United States), a unique number manufacturer number assigned by the National Plant Protection Organization (NPPO), HT for heat treatment or MB for methyl bromide, and DB to signify debarked.
Pallets that are heat treated and debarked are most likely safe for use. Avoid using pallets treated with methyl bromide or pallets that do not display an IPPC logo.
This content is accurate and true to the best of the author's knowledge and is not meant to substitute for formal and individualized advice from a qualified professional.
Questions & Answers
Question: Boiled linseed oil: I thought I was buying two bottles of raw linseed oil for my (veg) wooden planters, but by mistake one of them was "boiled". Unfortunately, I applied the "boiled" one. Can I make it safe by overcoating with the raw linseed oil or do I have to scrap the planters and start again?
Answer: Personally, I would go ahead and use the wood. It is not ideal, but since you are not eating directly off of the wood, it shouldn't be a problem. Put a second coat of raw linseed over the top.
Question: I used beeswax and mineral oil (much cheaper than jojoba in my area). How long would beeswax and mineral oil, used as a sealant, take to soak in the wood? My dog was very interested in the smell and I wouldn't want her to get diarrhea from the mineral oil.
Answer: I believe that if you put the wood out in the sun for a day or two, that would be sufficient.
Question: Is it safe to grow vegetables in a wood garden box that is waterproofed with FlexSeal?
Answer: As long as it allows for drainage, you could plant in it. It's not ideal, but better than not growing at all.
Lay on August 15, 2020:
This is so useful! Thank you.
Can I use Vaseline Petroleum jelly instead of beeswax?
debbie schiller on March 31, 2020:
Can the sealers you recommend be used to seal pretreated wood
(MCA) so the chemicals in the pretreated wood (pine) not leach out into a organic garden bed? If so what would be the best sealer or paint to use?
lisa greene on September 11, 2018:
did you mean 'lime' as in the fruit.. or lye... as in caustic substance used for soaps, decomposing farm animals..(the suggestion of gloves, and the info on how to use it makes me think the latter, but....)
Gary on March 18, 2018:
I've used linseed oil before for wood handles on garden tools and gunstocks.. the trick is to add a bit of (?cant remember formula) shellac to the oil. This allows the finish to have a hardened surface and is completely waterproof. I don't think it is toxic and the garden tools/gunstocks are great... could this be helpful?
Lisa on March 15, 2018:
I've been charring my woodframed raised beds. Looks beautiful, the Japanese people have been doing this for thousands of years. Pest hate charred wood, perseveres the wood for 70 to 80 years. When firing the sap seals the wood you can hear and see it.
Jim on January 28, 2018:
Voc doesn't always mean toxic to humans. And Zero Voc does not always mean it is toxic free. Voc only pertains to chemicals that react to sunlight to create smog. Paint companies want people to believe it is the end all be all for human health. I have read that peeling an orange can actually release Voc's. And I know there are plenty of paints out there that are "Voc free" but contain toxic odors. Just wanted to add some info to people who care about it, as I do.
Jonathan on September 01, 2017:
I'm thinking about using linseed oil first, for deep penetration, then the beeswax/mineral oil as a finisher/sealant. Any thoughts? I'm doing this for a cedar box using 1x8 boards. Thanks!
Deborah Minter from U.S, California on August 27, 2017:
Good article.
microfarmproject (author) on July 03, 2017:
It is safe for interior soil surfaces. However, since soil is almost continually wet, it might be better to use a product specifically made for use as a sealant for the interior (such as Soy Seal.) If you are using hardwood and have selected 2" thick boards, the milkpaint would be fine for the interior as these types of woods do not rot or warp quickly.
Mark on July 03, 2017:
Would the milkpaint work/safe for interior soil surfaces
K on May 28, 2017:
Does anyone know how many square feet one recipe for the Beeswax and Jojoba Oil covers? Great article, thank you!
Allison on May 03, 2017:
Does the beeswax and jojoba oil also work for the outside of the wood bed? Does it work in the elements? I'm in Southern California, so lots of sun. Also, I was planning on using redwood.
John Schiros on April 23, 2017:
Great info, thank u kindly.
Nemchik on March 23, 2017:
Question---
how much area would one batch of the #1 beeswax and jojoba oil cover?
planning 12"high bed
can you estimate inside and outside linear feet treatment?
Thanks
Cat on January 10, 2017:
Could you use been oil in recipe to help bug proof?
Jamie on September 07, 2016:
For the Beeswax and Jojoba mixture, is there a wax that can be substituted for my vegan urban farmers?
SeacoastDeb on June 10, 2016:
Thanks for the very thoughtfullly researched article.
RTalloni on August 18, 2015:
Thanks of this helpful information. We are planning ahead for raised by gardening in the near future and this topic was one I needed to do some research on before long. So appreciate see this lineup of sealers here.
Fay Favored from USA on June 25, 2014:
Thanks for the information and how to's of making safe containers for gardening.
Paula Hite from Virginia on April 07, 2014:
Wonderful lens! It was featured today on our Facebook page!
https://www.facebook.com/GreenThumbOnSquidoo
clouda9 lm on March 29, 2014:
I learned something new today and that is a good thing! Saving this in my gardening resources.
Im2keys on February 10, 2014:
great lens, thanks so much for the info!
tonyleather on January 28, 2014:
Great post! We use a lot of wood for our raised beds, so any advice on protection is very welcome! Thanks!
NicoleRM on January 24, 2014:
Nice lens
Eugene Samuel Monaco from Lakewood New York on January 21, 2014:
I always used linseed oil on windows berfoe I applied the glazing.It always seemed to work best for me. Thanks for all of the ideas here.
angelatvs on January 20, 2014:
Wow, great info in a fantastic lens!
Lynn Klobuchar on January 20, 2014:
Great ideas! Now do you have any ideas about getting the snow to go away?
microfarmproject (author) on July 19, 2013:
@anonymous: I would seal both inside and out.
anonymous on July 19, 2013:
Thanks for the great write up and instruction. Just built a greenhouse with raised beds and am looking forward to using the beeswax/mineral spirits method on the inside and milkpaint on the outside. Question: is it a good idea to seal the interior of the planting beds as well as the exterior? Will it help keep the inside of the beds from rotting over time from soil moisture? Thanks again!
microfarmproject (author) on April 16, 2013:
@anonymous: Yes, you can treat the wood at any time. Clean any soil off of the wood prior to treating. How long untreated wood will last depends on many factors, but it will certainly last longer if treated to resist moisture and damage from the sun.
anonymous on April 16, 2013:
bump
Can I try to use one of these methods on raised beds that are already built and outside? The wood is untreated and has only been outside for a week or two. How long can I expect untreated pine to last?
anonymous on April 14, 2013:
Can I try to use one of these methods on raised beds that are already built and outside? The wood is untreated and has only been outside for a week or two. How long can I expect untreated pine to last?
microfarmproject (author) on April 02, 2013:
@anonymous: I believe that coconut oil is fairly stable and would be suitable. I am not certain about avocado oil, however.
anonymous on April 02, 2013:
This article is exactly what I was looking for! Now I can take back all of the cedar I just bought and buy untreated pine for my garden boxes. I am wondering if I can substitute avocado or coconut oil for the jojobo oil? It seems to be quite a bit cheaper on Amazon. Thanks so much! Heidi.
anonymous on March 26, 2013:
I look forward to sping and fresh veggies! Thanks for sharing at A Humble Bumble :)
anonymous on March 25, 2013:
Very interesting--thanks! I just built a garden bed the other day and was already mourning how quickly it's going to rot....good to know there are some safe ways to preserve it :)
drcarl on March 08, 2013:
Interesting about the linseed oil; thanks!
microfarmproject (author) on February 21, 2013:
@anonymous: Links are near the bottom of the page. Thanks fo rvisiting and for hosting the hop!
anonymous on February 21, 2013:
Great recipes and tips! Thanks for linking up with the Eat Make Grow blog hop, but please include a link back to the hop. Thanks!
anonymous on February 16, 2013:
Thank you for sharing this on The Creative HomeAcre Hop!
Renaissance Woman from Colorado on August 11, 2012:
Really useful information here that I will be able to apply in my organic raised bed gardens (literally). Thank you!
dustytoes on July 04, 2012:
Now I have a reason to use my double boiler. Your wood finishing recipe sounds fantastic and I hope to get some raised beds built by this Fall. Thanks for that printable info.
Senditondown from US on June 28, 2012:
Nice and natural for our gardens. Good info and ideas. Thanks.
microfarmproject (author) on June 19, 2012:
@ItayaLightbourne: Thank you for the suggestion. I have added a poll. Great advice. Thanks!
Itaya Lightbourne from Topeka, KS on June 19, 2012:
Feel free to DELETE as this is a Rocket Squid Critique! I loved this article as I love gardening and pretty much anything to do with living more naturally and eco friendly. Great job on putting this very helpful info together and I loved the Milk Paint recipe! I would like to suggest that you consider adding either a Quiz, Poll, or Debate Module as it will encourage more interaction with your article from your readers. This in turn helps your article to be ranked more highly. A very well done article and I look forward to reading more from you in the future. :)
hntrssthmpsn on June 19, 2012:
I'm usually more of an in-the-ground gardener. In the last few years I've moved into containers, and this fall I'm planning to build raised beds. I'm eager to try your recipe for Homemade Beeswax and Jojoba Oil Wood Conditioner!
Cathy Slaght from St. Petersburg, Fl on June 18, 2012:
This is so interesting and helpful! Thanks!
anonymous on June 18, 2012:
Thanks for the information - my husband was just asking about protecting the wood in his new wine room - especially the table.
Laura45 LM on June 18, 2012:
Thank you this is very helpful information!
IMKZRNU2 from Pacific Northwest on June 18, 2012:
Thank you for this information! I like the beeswax/jojoba oil one for me.
Is Stain Ok For Garden Beds
Source: https://dengarden.com/gardening/top-5-safe-wood-sealers-for-raised-bed-and-container-gardens
Posted by: sabalahavock.blogspot.com
0 Response to "Is Stain Ok For Garden Beds"
Post a Comment